How to have an Amazon Storefront? What is an Amazon Storefront? Whether you’ve selected your first product and want to set up shop online, or have built a brand and want to go global, an online store is a great way to connect with customers and tap the opportunities available through ecommerce.
Building a digital storefront so you can manage inventory and ship goods can be a major hurdle on your way to success. It takes time and resources to create your own direct-to-consumer website, maintain a presence on social media, or sell through other online channels. Luckily, there are resources to help simplify the process, plus best practices you can follow to ensure a smooth experience.
We’ll walk you through how to create an online store, and also cover a suite of Amazon tools you can use to share products with millions of customers.
How to have an Amazon Storefront?
In this section, we will show you every step for how to build an Amazon Store for your brand. As mentioned above, you will need a professional seller account and to have a brand enrolled in Brand Registry in order to create a Store.
We recommend creating new images and infographics specifically for your Amazon Storefront. Don’t use the same images you have on your listing page — take the opportunity to change things up to attract customers and give them more visual information about your products.
As always, before creating images or videos, make sure you review Amazon’s creative guidelines for Stores. If you’re not great at graphic design or confident about your product photography, we recommend hiring a professional Amazon freelancer to create high-quality, Amazon Store compliant images.
We also have a fantastic YouTube video on how to create an Amazon Storefront. Check it out! Amazon Storefront Tutorial | Step by Step Guide to Building a Free Storefront
What is an Amazon Storefront?
Amazon Stores is a free self-service advertising tool for creating a dedicated destination for your brand on Amazon. Creating an Amazon Storefront is an incredible way to showcase all your products and increase your brand awareness through an easy-to-navigate interface that resembles an ecommerce website.
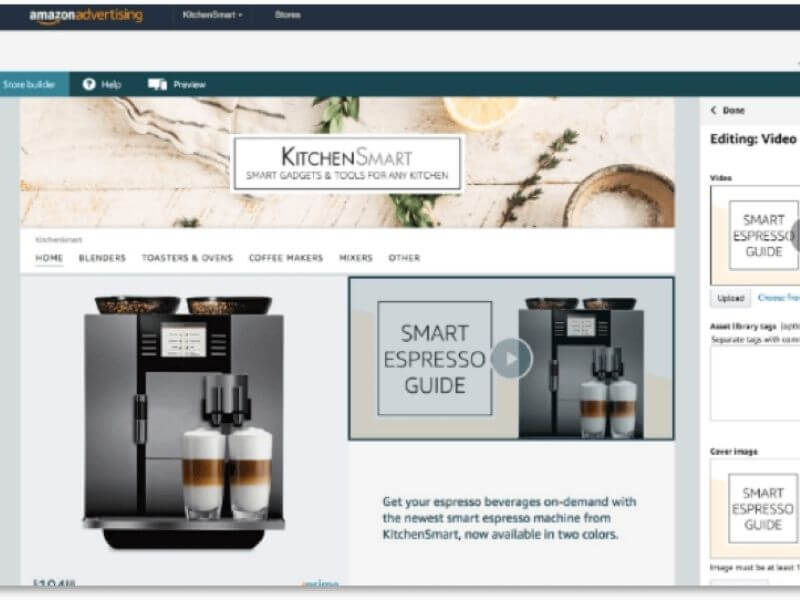
It’s easy to design a multipage Amazon Store with simple drag-and drop-tiles or pre-designed templates. You can customize your store by adding your own images, videos, and descriptions.
Understanding Amazon Storefront
Before we dive into the nitty-gritty of creating your Amazon storefront setup, let’s understand what it is and why it matters. Amazon storefront setup is a powerful feature that allows you to set up a virtual store on Amazon.com. You’ll even get your personalized storefront link for it. This link is invaluable for marketing activities outside of Amazon, as it redirects customers to your storefront setup, boosting customer loyalty and sales.
As a brand owner, you can design multiple pages within your Amazon storefront setup, showcasing your best-performing products and enhancing your brand messaging. It is important as customer loyalty results in recurring orders, a key factor in your success on Amazon.
You’ll need a “brand registry” on Amazon to leverage this powerful tool. It ensures your brand is protected and provides access to features like A+ content.
Amazon storefront requirements
Can anyone start an Amazon storefront? No, not every seller on Amazon can create an Amazon Store. To create a Storefront, you must meet the following requirements:
- Professional Seller Account. On top of needing to register your brand, you will need to have a professional seller account (instead of the free individual account), which any serious Amazon seller should have anyway.
- Brand Registry. In the past, Stores were only available to Amazon Vendors. Now, any third-party seller enrolled in Amazon’s Brand Registry can create an Amazon Store for free.
Benefits of Amazon Storefronts
Brands need to do everything they can to stand out from the competition on Amazon. Creating an Amazon Store is one way to do that. Let’s go over the benefits of creating a Store on Amazon.
1. Curated brand destination
Your Amazon Store educates your customers about your brand while showcasing all your products. Instead of having to search for each one of your products individually, shoppers can explore your entire product catalog in your Store.
You also have an opportunity to showcase your brand’s story to build recognition and to instil trust in your customers.
Brand Stores will have its own custom “Amazon.com” URL; for example: https://www.amazon.com/stores/JungleCreations/.
2. No competitor ads
In my opinion, one of the biggest benefits of having an Amazon Store is the freedom from competitor ads. Sponsored Products and Sponsored Brands ads create a lot of distractions on Amazon search results pages and even on product listings. But in your Store, customers will only see your brand.
3. Creative branding
You have the opportunity to flex your marketing creativity and fully customize your Store with great images, infographics, or even videos for your products. We all know how important your main product images and A+ content are — now, you’ll have even more space to completely customize the look and feel of your brand’s Store.
4. Drive traffic directly to your Storefront
With Sponsored Brands or Sponsored Display Ads, you can drive traffic directly to your Amazon Store. This allows you to funnel customers away from your competitor’s products.
You can also use your own social media accounts such as TikTok, Facebook ads, or email marketing to send traffic to your Store.
Brands can then use Amazon Attribution to track the performance of the off-Amazon traffic you send to your storefront.
Customers can also find your Store by clicking “Visit the [BRAND NAME] Store” underneath a listing’s title.
5. Add multiple pages and subcategories
If your brand includes multiple product categories and subcategories, you can create subpages to host them. For example, if you sell a range of kitchen appliances, you can set up pages for coffee machines, toaster ovens, air fryers, and other groups of items.
6. Store insights dashboard
The dashboard allows you to find out where your Store traffic is coming from, see how well your Store is driving sales, monitor page views, and more. These KPIs allow you to make accurate decisions about how you market your products and Store.
7. Mobile-friendly design
When building your Amazon Store, it will also be optimized for mobile, which is huge because over 126 million unique mobile users shop on Amazon using the Amazon app.
8. Higher conversion rates
Amazon Stores give you a unique opportunity to showcase your brand in a way that differs from the usual Amazon product listing. When customers visit your Store, they may have a higher chance of converting since they’ll only be interacting with your brand and you have the chance to show them why they should purchase from you.
Above is information about How to have an Amazon Storefront? What is this Amazon? that we have compiled. Hopefully, through the above content, you have a more detailed understanding of Amazon Storefront. Thank you for reading our post.